


Lösungen

Märkte
Referenzen
News / Events
Terminkalender
Aktuelles
eMagazin
Newsletter
Services
Unternehmen
Profil
Karriere
Partner
Presse
Kontakt

22. November 2017
How to connect NAV on Docker to an existing SQL database (quick and dirty)
When Freddy Kristiansen, Jakub Vanak and I talked about NAV on Docker at NAV TechDays, the first two questions from the audience were „can I connect NAV on Docker to an existing SQL database?“1 But in a short answer we could only say „yes, absolutely“ but not really explain it.
Today I also talked to Waldo about that topic and then there were some Twitter conversations going on about that topic, so I couldn’t resist and decided to write a bit about it. Freddy Kristiansen already said that he’ll have a post about this in his excellent blog series about NAV on Docker and he’ll probably show ways to do it in a more secure way, but here is the quick and dirty version. I’ll run my SQL Server inside another container but you could perfectly do the same with a traditional non Docker SQL Server. Here are the steps:
- Run the SQL Server Container or find a suitable SQL Server already running in your environment. The Docker command would be
docker run -d -p 1433:1433 --name sql -e sa_password=LyngbyHas1RedCarpet -e ACCEPT_EULA=Y -v C:/temp/data:C:/data/ microsoft/mssql-server-windows-express
where „LyngbyHas1RedCarpet“ is my fancy password which you can obviously change to whatever suits you. You can also see that we are mapping folder c:\temp\data in the host to c:\data in the Container, so you’ll need to make sure that c:\temp\data on the host exists
- Again only necessary if you want to create a new database in your SQL Server Container: Copy the .bak file of the database you want to use into c:\temp\data, so that the Container can pick it up at c:\data. Afterwards open a SQL management tool2, log in to the server (if necessary you can find the IP of the Container with
docker exec sql ipconfig) with either the SA user you created in step 1 or your regular user for your existing SQL Server and restore the database. I am using NAV 2017 CU 12 DE - Until now hopefully everything just makes plain sense. Now we need to make sure that the connection between the Docker NAV Server instance we’ll create soon and SQL Server works. That especially means that we need to tell NAV to use the SA user and password from step 13. In the NAV on Docker Github repo you can find a howto docx file which very briefly explains how to do that and I’ve taken the liberty to take the following script almost identically from there, so credit once more really should go to Freddy. What you need to do is create a file c:\temp\my\SetupConfiguration.ps1 and paste the following but make sure to change the
$DatabasePasswordvariable if you used something different than I did in step one:. (Join-Path $runPath $MyInvocation.MyCommand.Name) if (!$RestartingInstance) { Write-Host "Use custom user to access database" $DatabaseUserName = "sa" $DatabasePassword = "LyngbyHas1RedCarpet" $EncryptionPassword = "abc123ABC$%&abc123" $TrustSQLServerCertificate = $true $DatabaseSecurePassword = ConvertTo-SecureString -String $DatabasePassword -AsPlainText -Force $DatabaseCredentials = New-Object PSCredential -ArgumentList $DatabaseUserName, $DatabaseSecurePassword $EncryptionKeyPath = Join-Path $ServiceTierFolder 'DynamicsNAV.key' $EncryptionSecurePassword = ConvertTo-SecureString -String $EncryptionPassword -AsPlainText -Force New-NAVEncryptionKey -KeyPath $EncryptionKeyPath -Password $EncryptionSecurePassword -Force | Out-Null Write-Host "Import Encryption Key" Import-NAVEncryptionKey -ServerInstance NAV ` -ApplicationDatabaseServer $DatabaseServer ` -ApplicationDatabaseCredentials $DatabaseCredentials ` -ApplicationDatabaseName $DatabaseName ` -KeyPath $EncryptionKeyPath ` -Password $EncryptionSecurePassword ` -WarningAction SilentlyContinue ` -Force Set-NAVServerConfiguration -ServerInstance "NAV" -KeyName "EnableSqlConnectionEncryption" -KeyValue "true" -WarningAction SilentlyContinue Set-NAVServerConfiguration -ServerInstance "NAV" -KeyName "TrustSQLServerCertificate" -KeyValue $TrustSQLServerCertificate.Tostring().ToLowerInvariant() -WarningAction SilentlyContinue Set-NavServerConfiguration -serverinstance "NAV" -databaseCredentials $DatabaseCredentials }This first of all calls the standard script to make sure everything is set up properly and then configures the NAV Server instance to use the provided SA user and password. Putting a password in clear text into a script definitely is only acceptable in a demo / dev environment, so please don’t ever do this in a more sensitive environment (and don’t use the same password everywhere…).
- I’ve also put one of our license files into c:\temp\my so that I can directly import it on Container startup through param -e licensefile=… but that also might not be necessary for you. Now we can run our NAV Container and point it to the database with the following command
docker run -e accept_eula=Y -e DatabaseServer=sql -e DatabaseName="Demo Database NAV (10-0)" -e licensefile=c:\run\my\Infoma.flf --name nav --hostname nav -v c:\temp\my:c:\run\my microsoft/dynamics-nav:2017-cu12-de
This should result in an output like this
Initializing...
Hostname is nav
PublicDnsName is nav
Running Specific Image
Using NavUserPassword Authentication
Starting Internet Information Server
Using Database Connection sql/SQLEXPRESS [Demo Database NAV (10-0)]
Modifying NAV Service Tier Config File for Docker
Creating Self Signed Certificate
Self Signed Certificate Thumbprint AD59304811FFFCD2209C3818DE3B146AA571CC52
Modifying NAV Service Tier Config File with Instance Specific Settings
Use custom user to access database
Import Encryption Key
WARNING: You should encrypt the connection to the database to help protect
against network attacks, such as man-in-the-middle attacks.
To encrypt the connection, select the Enable Encryption on SQL Server
Connections setting (EnableSqlConnectionEncryption = True) and clear the Enable
 Trust of SQL Server Certificate setting (TrustSQLServerCertificate = False).
WARNING: The new settings value will not take effect until you stop and restart
 the service.
Start NAV Service Tier
Using license file 'c:\run\my\Infoma.flf'
Import NAV License
Creating Web Site
Creating NAV Web Server Instance
Creating http download site
Container IP Address: 172.31.104.90
Container Hostname  : nav
Container Dns Name  : nav
Web Client          : http://nav/NAV/WebClient/
NAV Admin Username  : admin
NAV Admin Password  : Noci4236

Files:

Ready for connections!
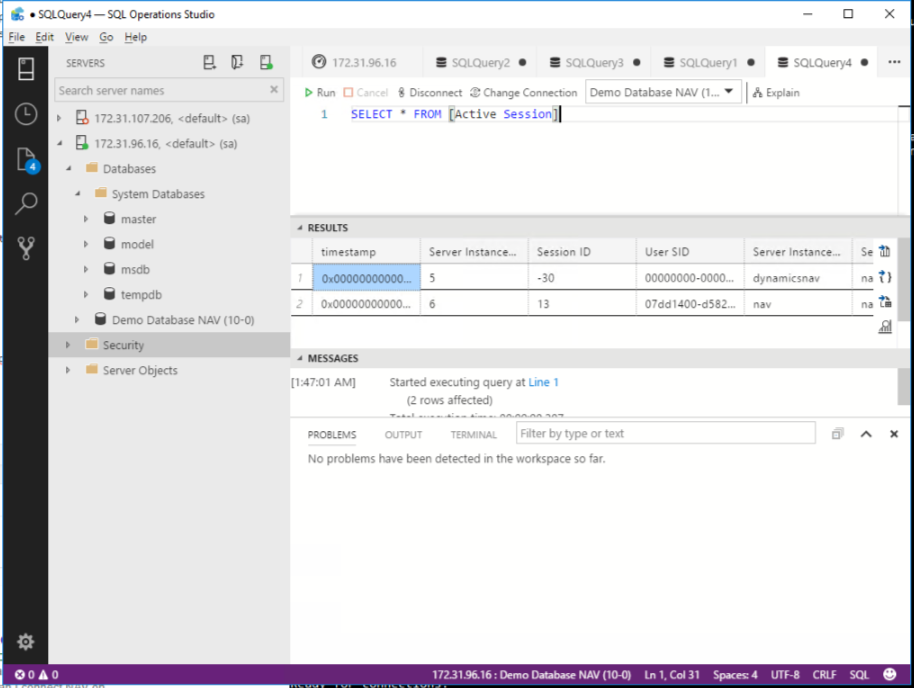
Now you can connect to e.g. the Web Client and verify that you are indeed using the database on the separate system by doing a
SELECT * FROM [Active Session]where you should then see you session similar to this
One word of caution: If you run multiple NAV Containers against the same database, the Container will always create a new password and show that in the output. But that actually is wrong from the second Container onwards, because the password will stay the one of the first Container as that user is only created if it doesn’t exist. And you also see that I didn’t map any ports (param -p) for both Containers to my host, so everything is only reachable on the host. If you e.g. would want to only make the WebClient available from other machines, you could add -p 8080:80 which would mean that the WebClient would be reachable thorugh port 8080 of the host. But that also is a topic for another blog post
Now I hope that while this is by no means „production ready“ it still helps to get the idea and also get it up and running a bit quicker
Update
As expected, Freddy Kristiansen has updated the NAV base images to very easily allow using an external SQL database without any custom script. The magic is done with a new env parameter databaseCredential which takes a user credential and authenticates against a given SQL database and server. So with that change my step 3 above is no longer needed and step 4 looks like this
$cred = Get-Credential
docker run -e accept_eula=Y -e DatabaseServer=sql -e DatabaseName="Demo Database NAV (10-0)" -e DatabaseCredential=$cred -e licensefile=c:\run\my\Infoma.flf --name nav --hostname nav -v c:\temp\my:c:\run\my microsoft/dynamics-nav:2017-cu12-de
I’ll keep the post above as I still think it has some value in showing how we can override stuff in the NAV image but you really should go for the new params as described below. Please note that this only works in the 0.4.0 version of the docker images which are only available through the private insiders repo as of Nov 27th 2017 but should become publicly available in the next few days
- the fact that the second person asked the same question again in somewhat different words speaks volumes about either my ability to answer the first question or his willingness to listen to my answer. Or about his interest in getting one of the TechDays shirts we gave out to people asking questions. Probably a bit of all :)
- I highly recommend the new SQL Operations Studio. Also an amazing new tool by MS where starting it, restoring the database and closing it again is quicker than the old SSMS has even finished starting
- We could also use gMSAs but that also is a bit more advanced and maybe a topic for a future post
RSS Feed
Kontakt

Kontakt
