


Lösungen

Märkte
Referenzen
News / Events
Terminkalender
Aktuelles
eMagazin
Newsletter
Services
Unternehmen
Profil
Karriere
Partner
Presse
Kontakt

9. April 2018
Dynamics 365 BC extension build in TFS / VSTS using containers
In the last couple of days I’ve seen multiple quite interesting blog posts about automatic build in TFS / VSTS for AL-based extension development for Dynamics 365 Business Central: Soren Klemmensen and Mike Glue shared their knowledge about build setup here and Kamil Sacek explained how you can get TFS-interpretable logging from the new AL compiler here. However I personally think the best way to do automated builds is using Docker containers, mainly for two reasons: a) I can be absolutely sure that my build environment is always clean and 100% reproducible and b) I can do builds for multiple NAV / BC versions and CUs on the same server. In the following post I’ll explain my setup.
The TL;DR
The first step is to create a Docker build image because the regular NAV / BC image is a bit too big as a build environment for my taste which makes builds a lot slower then necessary (I don’t need running SQL and NAV servers for compiling AL code…). Therefore I use a multi-stage image as explained before here to include the necessary minimum as well as add everything for signing my package. In my second step I use parts from the mentioned blog posts as well as from navcontainerhelper by Freddy Kristiansen to build the extension using just the source code from TFS and if the build succeeds, the resulting .app file also is signed. Of course, the second step also is running inside of a container, so the setup for my build server only requires installing Docker and the TFS agent, the rest just works.
The details about part 1: The multi-stage build image
I will focus on the parts I do differently than Soren and Mike. Depending on your TFS knowhow you might have to read their blog posts but independently of your knowledge those are recommended reads anyway.
For my build image I use a multi-stage image, which means that I take the NAV image and extract only what I need to a smaller image, based on Windows Server Core. The Dockerfile looks like this:
FROM microsoft/dynamics-nav:devpreview-finus AS full
ENV ACCEPT_EULA Y
ENV username=autobuild \
    password=autopassword

SHELL ["powershell", "-Command", "$ErrorActionPreference = 'Stop'; $ProgressPreference = 'SilentlyContinue';"]
COPY scripts c:/run/my
RUN .\Run\start.ps1

FROM microsoft/windowsservercore
SHELL ["powershell", "-Command", "$ErrorActionPreference = 'Stop'; $ProgressPreference = 'SilentlyContinue';"]
RUN mkdir c:\build
RUN mkdir c:\build\32
RUN mkdir c:\build\64
COPY --from=full c:/ForBuildStage/ c:/build
RUN Expand-Archive -Path (Get-ChildItem -Path c:\build\vsix -Filter "al*.zip")[0].FullName -DestinationPath c:\build\vsix
RUN Invoke-RestMethod -Uri https://tools.axians-infoma.de/signtool.exe -OutFile c:\build\signtool.exe
RUN Invoke-RestMethod -Uri 'https://tools.axians-infoma.de/Axians Infoma Code Signing.p12' -OutFile c:\build\signcert.p12
COPY --from=full C:/Windows/System32/NavSip.dll C:/build/32/
COPY --from=full C:/Windows/SysWoW64/NavSip.dll C:/build/64/
COPY --from=full C:/Windows/System32/msvcr120.dll C:/Windows/System32/
As you can see in lines 1-8 I am just starting a regular NAV container. I accept the EULA because I need to and set username and password to make sure I can later access the NAV Server. In line 7 I am copying some scripts into the container but for creating the build image only one is relevant, MainLoop.ps1. It gets the symbols and the vsix from my container and copies them together with two more scripts I’ll explain later into c:\ForBuildStage. The code looks like this
Write-Host "set up build environment"

Add-Type @"
using System;
using System.Net;
using System.Net.Security;
using System.Security.Cryptography.X509Certificates;
public class ServerCertificateValidationCallback
{
    public static void Ignore()
    {
        ServicePointManager.ServerCertificateValidationCallback +=
            delegate
            (
                Object obj,
                X509Certificate certificate,
                X509Chain chain,
                SslPolicyErrors errors
            )
            {
                return true;
            };
    }
}
"@

[ServerCertificateValidationCallback]::Ignore();

$pair = "autobuild:autopassword"
$bytes = [System.Text.Encoding]::ASCII.GetBytes($pair)
$base64 = [System.Convert]::ToBase64String($bytes)
$basicAuthValue = "Basic $base64"
$headers = @{ Authorization = $basicAuthValue }

Write-Host "Create folder"
mkdir -Path "c:\ForBuildStage"
mkdir -Path "c:\ForBuildStage\symbols"
mkdir -Path "c:\ForBuildStage\vsix"

Write-Host "Download symbols"
$hostname = hostname
$usURL = 'https://'+$hostname+':7049/NAV/dev/packages?publisher=Microsoft&appName=Application&versionText=12.0.0.0'
$sysURL = 'https://'+$hostname+':7049/NAV/dev/packages?publisher=Microsoft&appName=System&versionText=12.0.0.0'
Invoke-RestMethod -Method Get -Uri ($usURL) -Headers $headers -OutFile 'c:\ForBuildStage\symbols\Application.app'
Invoke-RestMethod -Method Get -Uri ($sysURL) -Headers $headers -OutFile 'c:\ForBuildStage\symbols\System.app'

Write-Host "Copy vsix as zip"
$vsixFile = (Get-ChildItem -Path C:\inetpub\wwwroot\http -Filter "al*.vsix")[0]
Rename-Item $vsixFile.FullName -NewName ($vsixFile.Name+'.zip')
Copy-Item -Path ($vsixFile.FullName+'.zip') 'C:\ForBuildStage\vsix'

Copy-Item -Path 'c:\run\my\build.ps1' c:\ForBuildStage
Copy-Item -Path 'c:\run\my\Convert-ALCOutputToTFS.psm1' c:\ForBuildStage
Lines 10-21 in my Dockerfile then describe the second stage: I am now building on top of windowsservercore instead of dynamics-nav as base image and I copy everything from C:\ForBuildStage over to my new image as well as downloading signtool.exe, a couple of dlls and a code signing certificate as we’ll need those to sign the app.
With that in place, I can create my first build definition which builds my Docker image based on the Dockerfile and scripts

When this build runs, it generates a full build environment inside a container. Depending on your NAV/BC usage, you might want to do this nightly, weekly or on demand when new CUs or releases become available.
The details about part 2: Using the build image
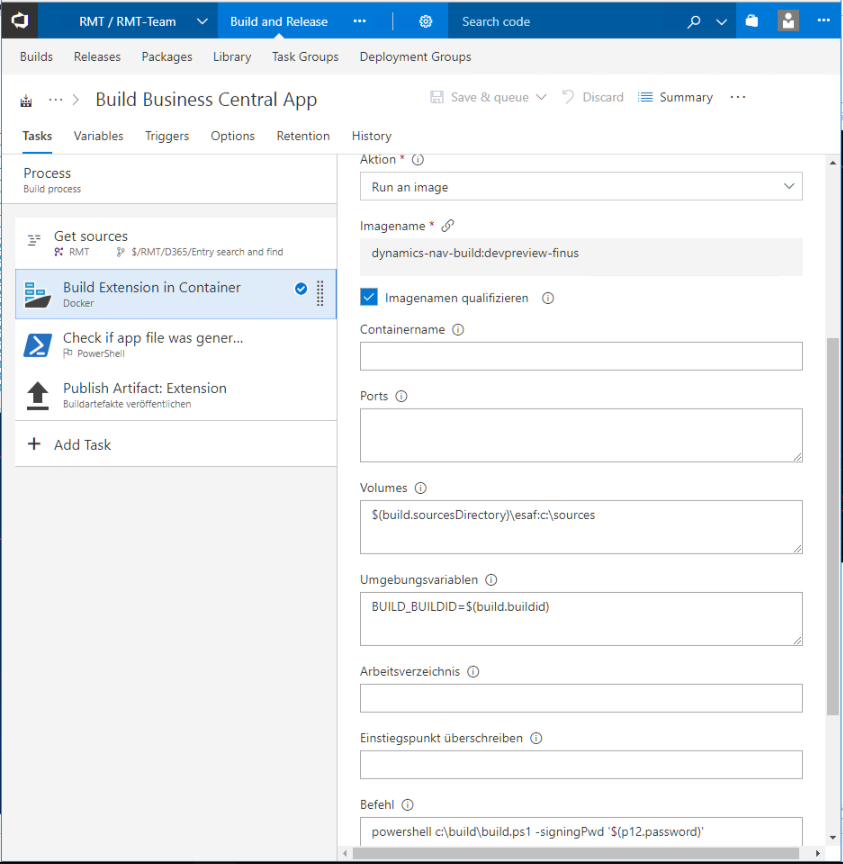
My second TFS build definition is slightly more complicated: First it downloads the source for my extension. Then it runs the build container and uses the build.ps1 script to call the AL compiler and sign the resulting .app file. As a safety measure it checks if an app file was generated and in the end it publishes the .app file as artifact, which means that I am able to directly download my compiled and signed extension from TFS. The build definition looks like this:
My build script looks like this and especially the first part will look familiar if you read Soren’s and Mike’s posts:
param
([string]$signingPwd)

Import-Module c:\build\Convert-ALCOutputToTFS.psm1

$ALProjectFolder = 'C:\sources'
$AlPackageOutParent = Join-Path $ALProjectFolder 'out'
$ALPackageCachePath = 'C:\build\symbols'
$ALCompilerPath = 'C:\build\vsix\extension\bin'
$ExtensionAppJsonFile = Join-Path $ALProjectFolder 'app.json'
$ExtensionAppJsonObject = Get-Content -Raw -Path $ExtensionAppJsonFile | ConvertFrom-Json
$Publisher = $ExtensionAppJsonObject.Publisher
$Name = $ExtensionAppJsonObject.Name
$Version = $ExtensionAppJsonObject.Version.SubString(0,$ExtensionAppJsonObject.Version.LastIndexOf('.'))
$ExtensionAppJsonObject.Version = $Version+'.'+$env:Build_BuildID
$ExtensionName = $Publisher + '_' + $Name + '_' + $ExtensionAppJsonObject.Version + '.app'
$ExtensionAppJsonObject | ConvertTo-Json | set-content $ExtensionAppJsonFile
Write-Host "Using Symbols Folder: " $ALPackageCachePath
Write-Host "Using Compiler: " $ALCompilerPath
$AlPackageOutPath = Join-Path $AlPackageOutParent $ExtensionName
if (-not (Test-Path $AlPackageOutParent)) {
    mkdir $AlPackageOutParent
}
Write-Host "Using Output Folder: " $AlPackageOutPath
Set-Location -Path $ALCompilerPath
& .\alc.exe /project:$ALProjectFolder /packagecachepath:$ALPackageCachePath /out:$AlPackageOutPath | Convert-ALCOutputToTFS

if (-not (Test-Path $AlPackageOutPath)) {
    Write-Error "no app file was generated"
    exit 1
}

RegSvr32 /u /s "C:\Windows\System32\NavSip.dll"
RegSvr32 /u /s "C:\Windows\SysWow64\NavSip.dll"
copy C:\build\32\NavSip.dll C:\Windows\system32
copy C:\build\64\NavSip.dll C:\Windows\SysWOW64\
RegSvr32 /s "C:\Windows\System32\NavSip.dll"
RegSvr32 /s "C:\Windows\SysWow64\NavSip.dll"

c:\build\signtool.exe sign /f 'C:\build\signcert.p12' /p $signingPwd /t http://timestamp.verisign.com/scripts/timestamp.dll $AlPackageOutPath
I am building my version string a bit differently, but the main change is lines 33-40: Here I unregister and register the NavSip.dll to make sure we can sign .app files (this piece of code will be familiar to people who have looked in to the navcontainerhelper implementation). Line 40 then does the actual signing and uses a parameter which in turn uses a build variable where the password for the p12 file is stored. In line 26 you can also see Kamil’s Convert-ALCOutputToTFS function to make sure TFS can interpret errors and warnings from the new AL compiler.
Now I can enable Continuous Integration for my build and get automated builds for every check-in or pull request in my version control system. I can even do a gated check-in / only allow successfully built PRs because with my way smaller multi-stage image building and signing only takes around 30 seconds, so it really shouldn’t interrupt the development flow too much.
Once more, I really love the direction Dynamics NAV / BC is taking. It might not be fully on par yet with other programming environments, but it makes huge steps forward and gets better every week!
Der Autor
Kategorien
AllgemeinSchlagwörter
RSS Feed
Kontakt
Kontakt
